
Just click on the image above to begin shopping these great deals!
Don't forget to stop back tomorrow for the Pals Paper Arts Sketch Challenge.
Michelle


Just click on the image above to begin shopping these great deals!
Don't forget to stop back tomorrow for the Pals Paper Arts Sketch Challenge.
Michelle

Today's card is super simple yet very striking (in my humble opinion). I used the new beautiful new stamp set Watercolor Wings. Watercoloring is on trend and this stamp set makes it so easy to create a work of at.

The butterfly is created with a three step stamp set. I believe I did this wrong. I stamped the outline of the stamp first using Delightful Dijon. Then I stamped the filler which is more muted and I used Hello Honey after stamping off once on a separate sheet of paper. The third stamp which creates the body of the butterfly I stamped in Tangelo Twist.
Now I said that I did it wrong. I say that because the second stamp extended beyond the first stamp on the right hand side. In the future I am going to do this stamp first and then stamp the outside of the butterfly. I could have remade this card but I thought it offered more to show you my mistake.
The butterfly was so pretty I really did not want to add much to the card. A single strip of Bohemian Designer Washi Tape seems to be the perfect finishing touch.
Clean simple and striking whether you are sending a get well message, thank you or just thinking of you.
Thanks for stopping by.
Michelle

And here are the supplies I used to create the card:

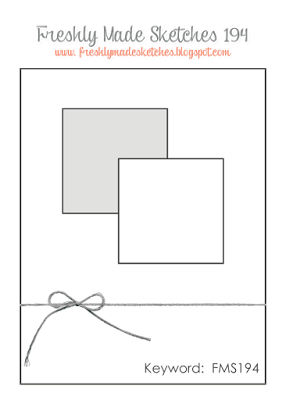
My card today is doing double duty. It was inspired by two card challenges. Freshly Mades Sketches and the Pals Paper Arts Color Challenge. Here are the two badges:
The Brushed Silver outer squares are 2 3/4". The DSP and stamped image squares are 2 1/5". I adore the new script font pattern in the DSP Paper Stacks. The stamped image is from the Watercolor Words stamp set. I could not wait to ink this set up.
July 1st began the new fiscal year for Stamping' Up! and they are changing up the Weekly Deals program. Each week they will provide Bonus Deals up to 60% on certain products. This week many NEW products are on sale. I took advantage of these deals and hope you will too. Click on any item below to begin shopping.

Wow, it seems like forever since my last post. We were away on vacation and as soon as we got home my dad (who just turned 81) came for a week long visit. I am so out of my rhythm.
As I just said, John and I recently returned from a two week vacation. This is the first time I have ever taken over two weeks off of work (that did not include Christmas/NY holidays). I know I am crazy. And this is our first vacation since we became empty nesters. It seemed weird to plan a vacation without our boys. It was a bit of a last minute trip since we needed to wait and see what they were each doing for the summer and then plan accordingly. So in late April we signed up for two weeks in Alaska! This was not one of those places where I always dreamed of going however I don't necessarily like to go back to somewhere when there are so many places we have not seen. So when John suggested Alaska I said "okay let's do it".
Our first week was a cruise and the second week was through a company called Backroads. I cannot recommend them enough if you like active vacations. This was our sixth trip with them and they always provide an amazing vacation experience.
Since I have not had much time in my craft room I thought I would share a few favorite photos from the trip.
The cruise started in Vancouver (fabulous city and where we must go back to really take it in). Then we cruised northbound through the inside passage of Alaska. We stopped in a town called Ketchikan and did a great hike. It was only a few miles however it was a 2,500 ft elevation gain. Here is a pic from the first lookout at 1,200 ft.

During the cruise we did more hiking, some whale watching and went zip lining. Once we transitioned to the Backroads portion of the trip we got even more active. And on the third day of that trip we did a 8 mile roundtrip hike to the Harding Icefields. This was one of the toughest hikes we have ever done. (Remember we live at sea level, there are no elevation hikes in Florida.) It was a 3,000 ft elevation gain and the last section of the hike was through snow.

I purposefully did not crop this photo as I think the big sky adds to the sense of how high we had gotten and the fact we were still climbing. You can really see the steepness of the slope we were climbing in this photo as well. This is John during that last stretch to the Icefield. An Icefield is behind a glacier. We hiked along the Exit Glacier one of many glaciers emerging from the Icefield.

The beginning of the Icefield. The Harding Icefield is 400 square MILES. It is hard to even get your head around.

I just wanted to prove I was there too!
The next day we did a 33 mile bike ride into the town of Homer. We stayed on Homer Spit which was surrounded by water. As we sat on our balcony at the hotel we watched the Sea Otters play. Amazing.

Along the ride as we rode onto the spit we passed was seemed like a boat junk yard. I figured we could get this boat house on the cheap if we decide to relocate to Alaska.
I hope you enjoyed seeing a bit of our trip. It is a beautiful part of our country and the people were warm and welcoming. There are great micro-breweries as well. Definitely a destination to add to your travel list.
I will be crafting and getting some projects ready to share. Thanks for stopping by. Remember I love to hear your comments.
Michelle


